


Star Gazer mushrooms are a charming and unique variety that many mushroom fans and cultivators locate worthwhile to develop. Whether you are a beginner or an experienced mycologist, studying how to cultivate Star Gazer mushrooms properly can make sure a successful and plentiful harvest. In this comprehensive manual, we can walk you via the complete method, from gathering substances to harvesting your personal Star Gazer mushrooms.
Understanding Star Gazer Mushrooms
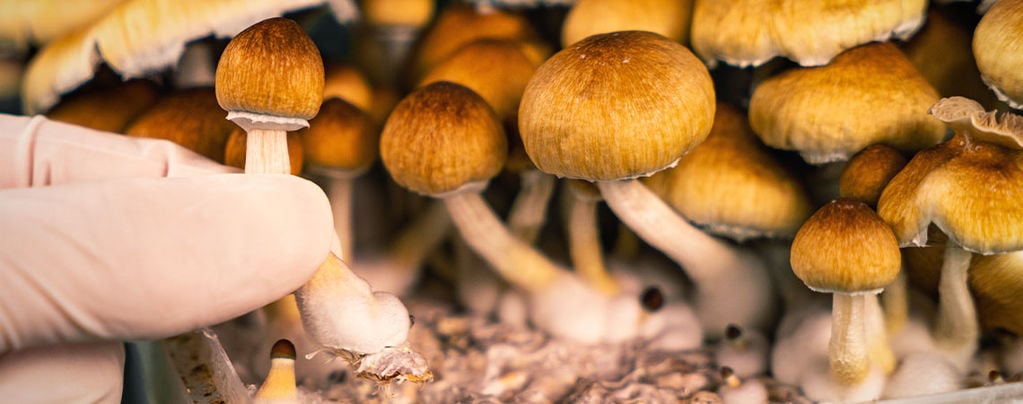
Before you start the developing system, it is vital to recognize the traits of Star Gazer mushrooms. They are acknowledged for his or her exceptional look, presenting reddish-brown caps and thick stems. Their potency and wealthy records make them a popular preference amongst cultivators. Because they require precise developing conditions, persistence and interest to element are important for a success cultivation.

Step 1: Gather Your Materials
To grow Star Gazer mushrooms, you may need the following substances:
Spores or Liquid Culture: You should purchase Star Gazer spore syringes or liquid lifestyle from a reputable provider.
Substrate: A nutrient-wealthy substrate is essential for wholesome mycelium growth. Common substrates consist of brown rice flour and vermiculite, or a bulk substrate like coconut coir and manure.
Jars or Grow Bags: Mason jars or develop bags with filters for air trade will help incorporate your substrate.
Pressure Cooker or Steam Sterilizer: Sterilization is essential to save you infection.
Still Air Box or Laminar Flow Hood: These equipment assist preserve sterile conditions while inoculating your substrate.
Incubation Chamber: A dark, warm place (seventy five-80°F) for colonization.
Fruiting Chamber: A humidity-controlled environment with fresh air change.
Misting Bottle and Hygrometer: To hold humidity and reveal conditions.
Step 2: Prepare the Substrate
The substrate offers the nutrients Star Gazer mushrooms need to grow. A popular technique includes the use of brown rice flour and vermiculite:

Mix 2 parts vermiculite, 1 part water, and 1 part brown rice flour in a big bowl.
Fill the combination into sterilized mason jars or grow baggage, leaving area at the top.
Seal the jars with breathable filters or cover them with aluminum foil.
Alternatively, if using bulk substrate, put together coconut coir and manure through nicely hydrating and pasteurizing them.
Step 3: Sterilization
Sterilization is one of the most critical steps to prevent infection. Follow those steps:
Place your substrate-crammed jars in a stress cooker.
Heat to 15 PSI for ninety mins to do away with any micro organism or mold spores.
Allow the jars to chill completely earlier than inoculation.
Step 4: Inoculation with Star Gazer Spores
Once your substrate is sterilized and cooled, you may introduce the spores or liquid subculture.
Clean your workspace and arms with alcohol.
In a nonetheless-air container or laminar drift hood, inject 1-2 mL of spore answer into every jar.
Seal the jars and area them in an incubation chamber at seventy five-eighty°F.
Wait for the mycelium to colonize the substrate completely (this takes 2-four weeks).
Step 5: Preparing for Fruiting

Once the jars or bags are fully colonized, it’s time to put together for fruiting.
Carefully switch the colonized substrate (called the “cake”) to a fruiting chamber.
Maintain high humidity (85-95%) the use of misting and a humidifier.
Provide indirect light and fresh air alternate to encourage growth.
Keep the temperature round 70-75°F.
Step 6: Fruiting and Harvesting
After a few days, you should begin to see mushroom pins forming. Follow those steps for a a hit harvest:
Continue misting and fanning to hold right humidity and oxygen stages.
When the caps begin to open, it's time to harvest!
Twist and pull the mushrooms gently to avoid detrimental the mycelium.
Step 7: Drying and Storing Star Gazer Mushrooms
For long-time period garage, drying the mushrooms is the fine alternative:
Place the freshly harvested mushrooms on a dehydrator at one hundred ten°F for 6-12 hours.
Alternatively, use a fan drying approach followed through a desiccant for thorough drying.
Store the dried mushrooms in an hermetic field far from warmth and moisture.
Troubleshooting Common Issues
Contamination: If you notice green, black, or foul-smelling contamination, discard the affected batch and make certain better sterilization next time.
Slow Colonization: Check for temperature fluctuations and make certain the spores are feasible.
No Mushroom Growth: Increase humidity and make sure sparkling air exchange is enough.
Final Thoughts
Growing Star Gazer mushrooms is a worthwhile system that requires persistence and precision. By following these steps cautiously, you may cultivate a a hit batch and revel in the end result of your hard work. Whether you're growing for non-public use or studies, know-how the desires of Star Gazer mushrooms will cause a thriving harvest.
Looking for tremendous Star Gazer spores or mushroom liquid cultures? Check out Lady Hyphae for top class mushroom cultivation supplies!